A loose basin drain at the top can be a nuisance, causing water leakage and potential damage to your bathroom or kitchen. As a professional basin drain supplier, I've encountered this issue numerous times and have gathered effective solutions to share with you. In this blog, I'll guide you through the process of fixing a loose basin drain at the top, step by step.
Understanding the Problem
Before we dive into the fixing process, it's essential to understand why a basin drain might become loose at the top. There are several common reasons:
- Wear and Tear: Over time, the constant use of the sink can cause the drain components to loosen. The vibration from water flowing through the pipes and the movement of the stopper can gradually loosen the connections.
- Improper Installation: If the basin drain was not installed correctly in the first place, it's more likely to become loose. This could include not tightening the nuts properly or using the wrong size of components.
- Corrosion: In areas with hard water or high humidity, the metal parts of the drain can corrode. Corrosion weakens the connections and can lead to a loose drain.
Tools and Materials You'll Need
To fix a loose basin drain at the top, you'll need the following tools and materials:
- Adjustable Wrench: This will be used to loosen and tighten nuts.
- Plumber's Putty: This helps create a watertight seal between the drain and the sink.
- Screwdriver: Depending on the type of drain, you may need a Phillips or flathead screwdriver.
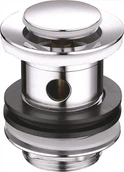
- Replacement Parts: If any parts of the drain are damaged, you may need to replace them. You can find a variety of high - quality basin drains on our website, such as Brass Pop Up Sink Drain Waste, Pull Up Basin Waste, and 130mm Unslotted Basin Waste.
Step-by-Step Fixing Process
Step 1: Turn Off the Water Supply
Before you start working on the drain, it's crucial to turn off the water supply to the sink. This will prevent any water from flowing out while you're making repairs. Locate the shut - off valves under the sink and turn them clockwise until they're fully closed.
Step 2: Remove the Stopper
The stopper is usually located at the top of the drain. Depending on the type of stopper, you may need to unscrew it or lift it out. If it's a pop - up stopper, you can usually remove it by pulling it straight up. If it's a screw - in stopper, use a screwdriver to remove it.
Step 3: Loosen the Locknut
Under the sink, you'll find a large locknut that secures the drain to the sink. Use an adjustable wrench to loosen this locknut by turning it counterclockwise. Be careful not to damage the pipes or the sink while doing this.
Step 4: Remove the Drain Assembly
Once the locknut is loose, you can remove the drain assembly from the sink. Gently pull the drain up through the sink opening. You may need to wiggle it a bit to break the seal.


Step 5: Clean the Drain and Sink Opening
Use a clean cloth to wipe away any dirt, debris, or old plumber's putty from the drain and the sink opening. Make sure the surfaces are clean and dry before proceeding.
Step 6: Apply New Plumber's Putty
Take a small amount of plumber's putty and roll it into a thin rope. Place the rope of putty around the top edge of the drain flange. This will create a watertight seal between the drain and the sink.
Step 7: Reinstall the Drain Assembly
Carefully insert the drain assembly back into the sink opening. Make sure it's centered and aligned properly. From under the sink, thread the locknut onto the drain and tighten it using an adjustable wrench. Tighten it enough to create a secure seal, but don't over - tighten it as this can crack the sink.
Step 8: Reinstall the Stopper
Put the stopper back in place. If it's a pop - up stopper, make sure it operates smoothly. If it's a screw - in stopper, use a screwdriver to tighten it.
Step 9: Turn On the Water Supply
Once the drain and stopper are reinstalled, turn on the water supply by turning the shut - off valves counterclockwise. Check for any leaks around the drain. If you see any leaks, turn off the water again and tighten the locknut a little more.
Tips for Preventing Future Issues
- Regular Maintenance: Periodically check the drain for any signs of looseness or damage. Tighten any loose nuts or replace worn - out parts as needed.
- Use High - Quality Products: Invest in high - quality basin drains like the ones we offer on our website. They're more durable and less likely to develop problems.
- Avoid Overloading the Sink: Don't put excessive pressure on the sink or the drain. Avoid dropping heavy objects into the sink, as this can loosen the drain connections.
Contact Us for Your Basin Drain Needs
If you're facing persistent problems with your basin drain or if you're interested in purchasing high - quality basin drains, we're here to help. As a leading basin drain supplier, we offer a wide range of products to meet your needs. Our team of experts can provide you with professional advice and guidance on choosing the right drain for your sink. Whether you need a Brass Pop Up Sink Drain Waste, Pull Up Basin Waste, or 130mm Unslotted Basin Waste, we've got you covered.
References
- "Plumbing for Dummies" by Richard Trethewey and Carson Dunlop
- "Complete Guide to Home Plumbing" by Reader's Digest